Hole saw saver

Hole saw saver
FAMILY HANDYMAN

Stuff your hole saw with a moist rag. It will not only keep your saw cooler and the teeth sharper but also extend the life of the saw. Remember to leave room for the depth of the piece of wood you’re cutting. When you’re finished, dry off the saw to prevent rust. — Scott Nugent

Advertisement

Need an awl? Make one

Need an awl? Make one
FAMILY HANDYMAN

Can awl of us find our awl when we need it? Grab an old, battered Phillips screwdriver and grind the tip into a sharp cone shape on a bench grinder. (Wear eye protection.) Now you have a heavy-duty awl for starting screws and finish nails right on the mark, and chipping dried glue from project corners.

Check out these genius hand tool hacks you need to know.

Pocket-size glue spreaders

Pocket-size glue spreaders
FAMILY HANDYMAN

When face-gluing boards, use an old credit card snipped along its wide edge with a pinking shears. The serrated “pinked” edge spreads the glue like a serrated trowel spreads mastic on floors. Thanks to reader Don Cox for this smooth tip.

Trim edge banding with a chisel

Trim edge banding with a chisel
FAMILY HANDYMAN

Iron-on edge-banding is a quick way to cover up an edge on plywood. Trimming the excess, however, is tricky. I’ve tried edge-banding trimmers, but I find the results are unpredictable. With the trimmers I’ve tried, it wasn’t easy to change the direction of the cut to suit the grain direction of the edge-banding. If you’re cutting against the grain, you’re likely to tear out a chunk of your new edge-banding. Instead, I use a wide, sharp chisel. This way, I can read the grain direction and trim accordingly. Angle the chisel slightly and go slow, raising the back corner of the chisel just enough so that it doesn’t dig into the plywood veneer. Smooth the corner with a sanding block after trimming.

Find out how to use a wood chisel.

An extra hand for cutting sheet goods

An extra hand for cutting sheet goods
FAMILY HANDYMAN

Here’s a safe and sound way to make long cuts with a circular saw on plywood clamped to a worktable. Cut about 30cm into the plywood, then twist a piece of duct tape into a bow tie, with up-and-down adhesive faces. Slide it in the saw kerf and press the tape down above and under the plywood. Now as you finish the cut, the trailing end can’t curl down dangerously as you saw. Hats off to Mike Connelly for simplifying this job.

Poor man’s jointer

Poor man’s jointer
FAMILY HANDYMAN

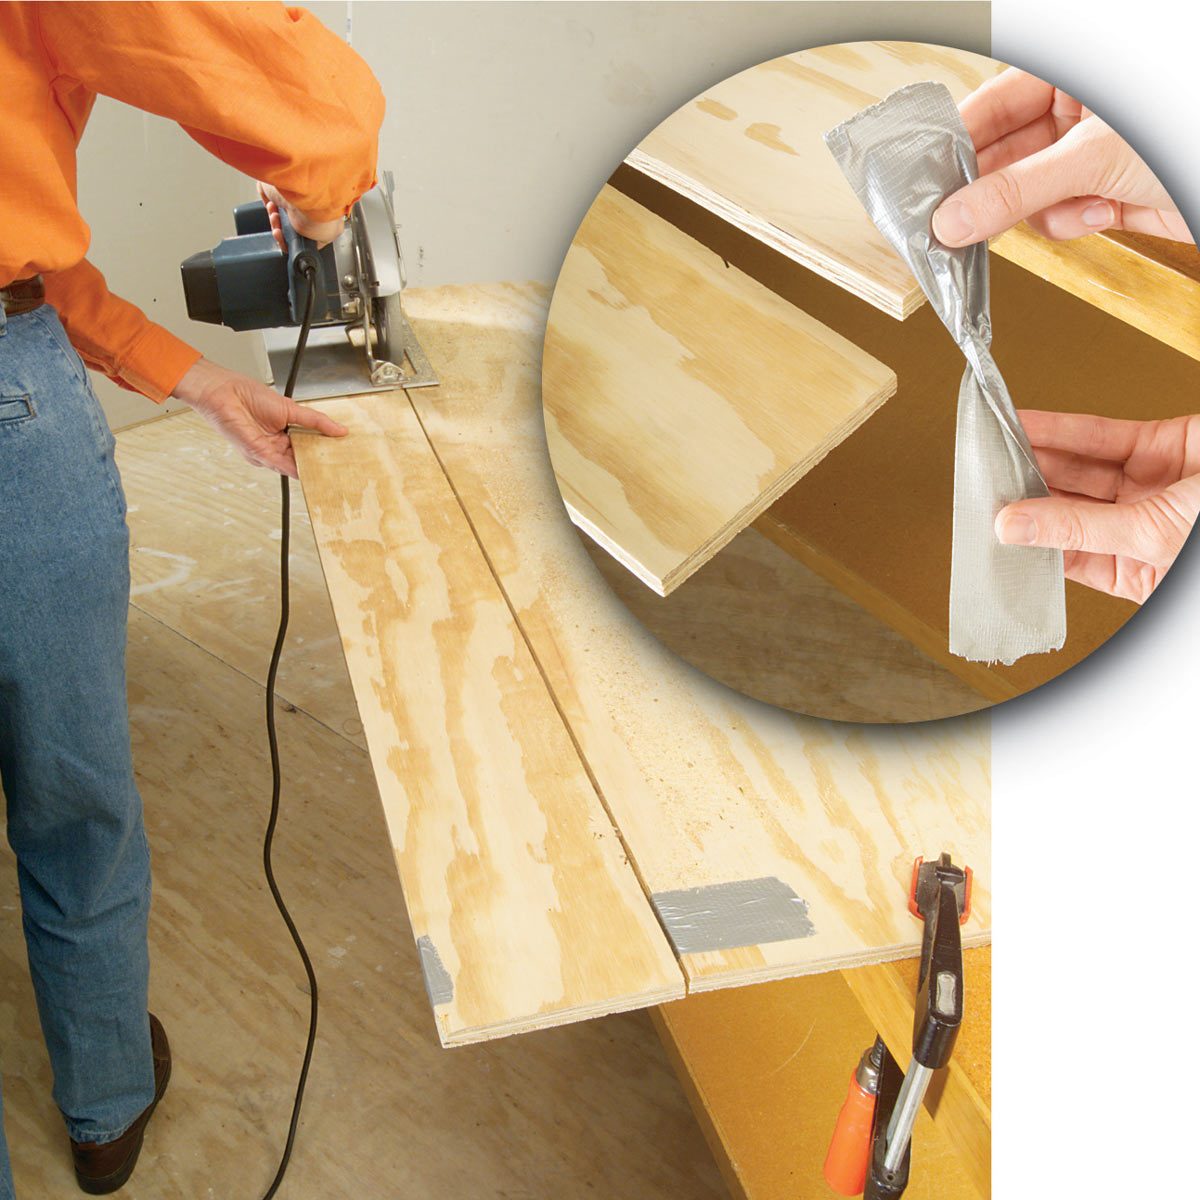
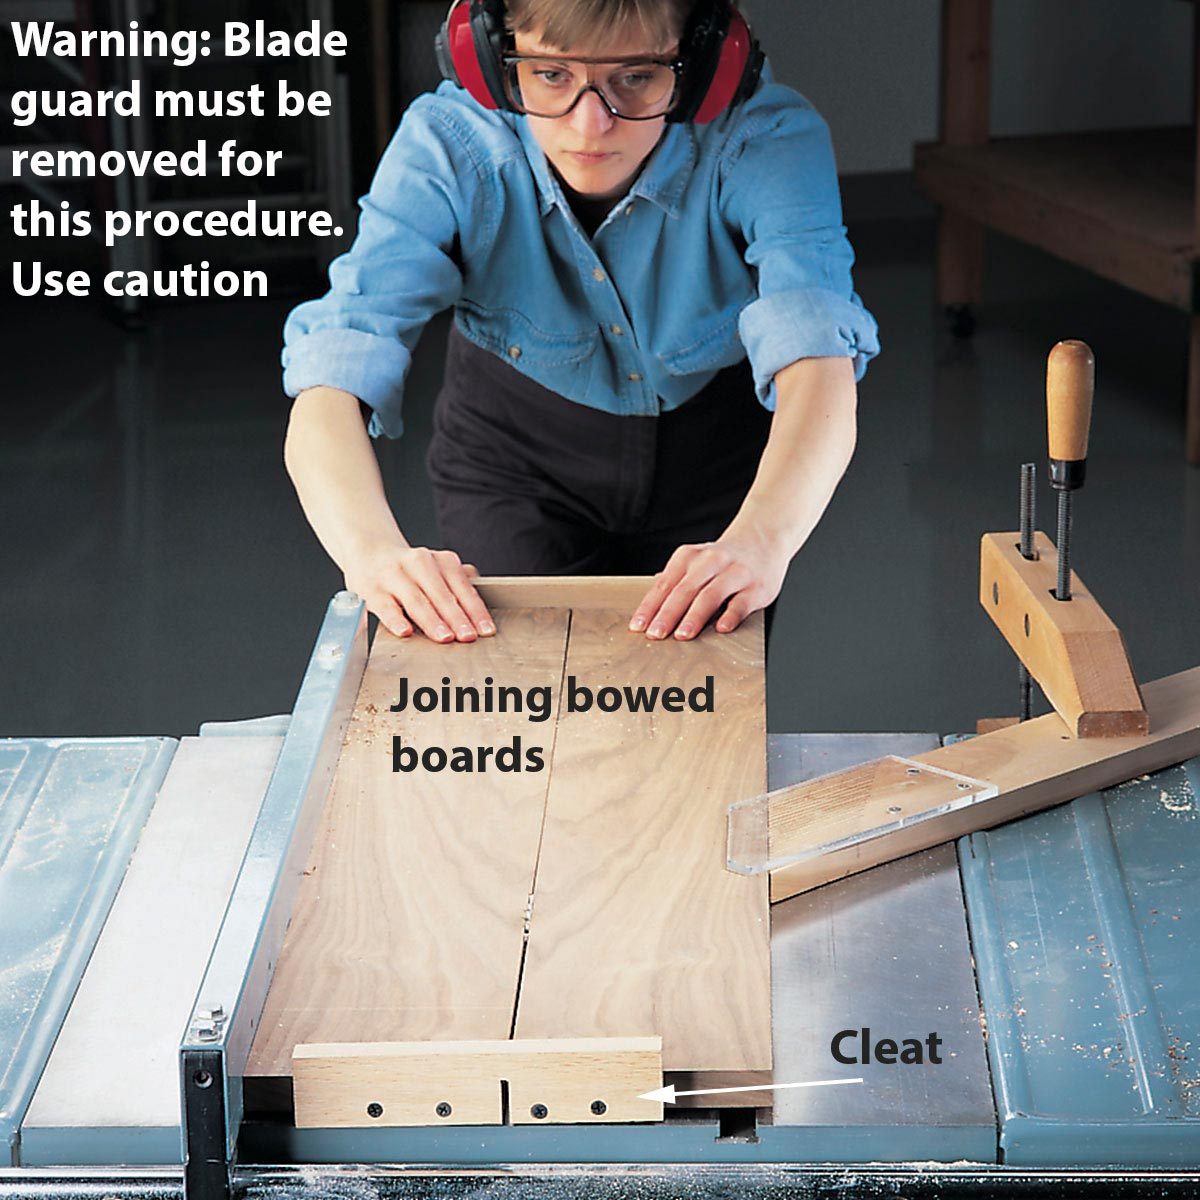
Lacking a jointer? Use reader Court Kites’ awesome tip to create perfectly matched glue joints on wavy or bowed board edges. Lay the boards on a flat surface, then clamp them across the middle with a bar clamp. Lay two 20cm long by 45mm wide scrap boards across each end and screw them in with four 30mm long screws, two per board. Keep the screws well away from your future cutting line!

Set the table saw fence so the blade is centred on the seam, then push the whole thing through the saw. If the board edges are quite bowed or curvy, you may need a second pass. If so, unscrew the cleats, reclamp the boards across the middle centre, then screw on the cleats again. The screws ding up the ends of the boards a little, so cut the boards you’re jointing a bit long, then trim 12mm from each end to remove the screw holes.

How to renew old epoxy

How to renew old epoxy
FAMILY HANDYMAN

A while back, I reached for my two containers of epoxy and noticed that the resin in one container had crystallised exactly like honey that’s been in the cupboard too long. The solution is exactly the same too: Set the container in a bowl of hot tap water. After about 15 minutes, I emptied the container and refilled it with hot water. After about a half hour, the epoxy regained its normal consistency. Good as new. — Ken Holte

Quick fix for dents

Quick fix for dents
FAMILY HANDYMAN

Dents in wood surfaces can be annoying. But fret not, they can be fixed. Simply soak a washcloth in water and ring it out a bit so it’s not sopping wet. Put the damp washcloth on the affected area. The water will wick through the wood, and that’s fine. Now, with your iron on its highest setting, place it on the damp washcloth over the affected area, and make small movements back and forth and in circles. Press down firmly and continue until your wash cloth is dry. It won’t take long to evaporate. At this point, the wood fibres are absorbing the water and should expand back to where they were originally. Continue this process and repeat by adding more water until the dents rise up to be flush with the rest of the material.

Sign up here to have Handyman’s favourite stories straight to your inbox. 

Source: Family Handyman