Step 10

Tip up the gable

The gable rafters are cut to the same shape and dimensions as the ledger rafters. Fasten the peaks together with a few screws and brace them in two places with 2x4s to install them.

Have another pair of 2×4 braces cut to the same length as the gable depth ready to brace the gable to the house. Then tip the gable up and attach it to the front of the beams and to the braces. Check the gable for plumb; adjust if necessary.

Advertisement

Step 11

Drop in the ridge beam

Build the ridge beam, then add a hanger to the peak of the ledger rafters and gable rafters. Drop the beam into place and nail it through the hangers using the nails called for by the hanger manufacturer.

Step 12

Step 12
FAMILY HANDYMAN

Phase 3: Add the rafters

To finish the roof structure, make rafters by cutting two standard 2×6 or 2×8 boards. You could purchase prebuilt trusses for your project, but making your own is less expensive and you won’t have to wait for the manufacturing process.

Step 13

Step 13

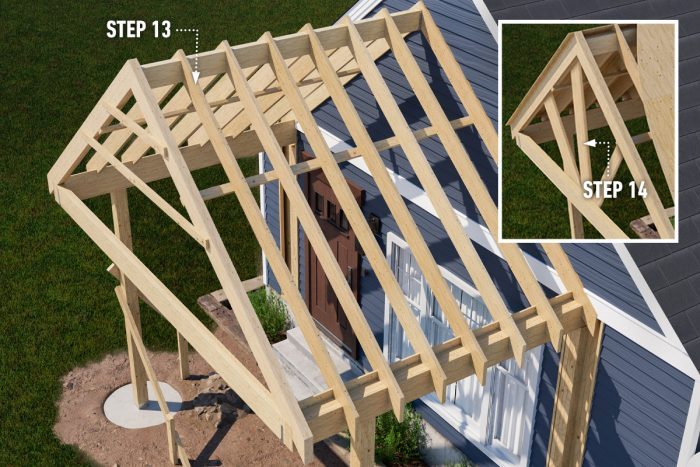
Cut and install the rafters

To mark the bird’s-mouths and the plumb cuts at the peak and eave consistently, use one of the cut rafters as a template. Note that the bird’s-mouth cannot be cut more than one-fourth the width of the rafter. When the rafters are cut, space them 400mm on-centre from the house at the peak and at the eave, then fasten them into place.

Step 14

Add rafter supports

To support the fronts of the ridge beam and rafters, add vertical support from the cross beam to the ridge beam and gable rafters. To support the gable rafters, add a double layer of 2x6s in the centre, cutting them to fit. They will help hold up the front of the structure and are decorative as well.

Step 15

Step 15
FAMILY HANDYMAN/COURTESY BRAD STALEY

Phase 4: Sheathing and shingles

Install the roof sheathing to complete the structure of the entryway. Then protect it from the weather with water-resistant layers that shed water off the roof.

Step 16

Stagger the sheathing

Lay the plywood or oriented strand board (OSB) on the rafters starting at the bottom, arranging the sheets so any seams meet with factory edges in the centre of a rafter. Lay the first sheet in each course past the gable; you’ll trim this later and then cut the next sheet to fit.

Fasten the sheathing with ring shank framing nails and make sure the seams are staggered on different rafters. Continue attaching the sheathing through the top course, which will be cut to width.

Step 17

Water-resistant barrier

The water-resistant barrier starts with an ice-and-water shield – a self-adhered membrane applied along the eaves. Then comes a layer of roofing felt starting at the eaves and overlapping all the way to the peak. Next are the flashing and shingles.

Start with kickout flashing at the eave, then add a few layers of step flashing, followed by the starter course of shingles. Overlap the shingles, alternating between shingles and step flashing where the roof meets the house. Make sure the shingle and flashing layers shed rainwater to the next layer on its way off the roof. Cover the peak with ridge cap shingles.

Step 18

Step 18

Finishing touches

Polish the look of the porch with trim and tongue-and-groove boards to hide the construction timber.

Step 19

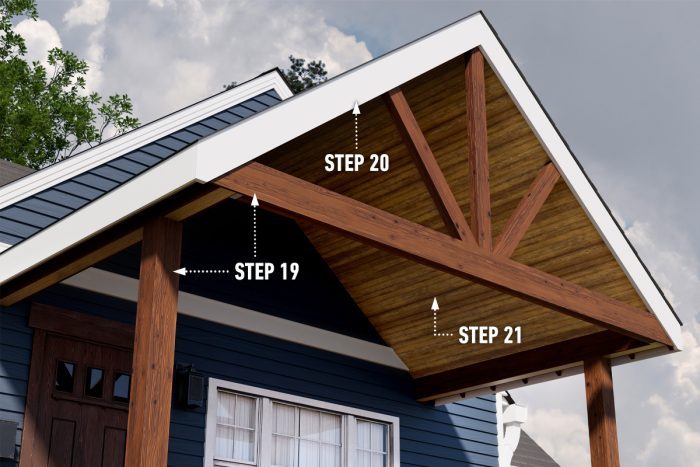
Wrap the posts and beams

To complete the look, trim the beams and posts. Choose rot resistance timbers, or go with maintenance-free composite material.

To cover the beams, cut boards to fit their width and fasten the boards to the bottoms, then cover the sides the same way. For each post, cut two boards to fit the width and then two more to cover the rest.