Wine storage

Wine storage
FAMILY HANDYMAN

If you have a wet bar, consider building wine storage into your staircase. It’s a beautiful project and frees up space in your bar – or, depending on the size of your collection, maybe even an entire room.

Start with the casework

Build this wine rack as you would a fixed shelving unit, using 2mm plywood for the casework and shelves. Assemble and install only the casework; it will be much lighter to handle. Trim to match your style and apply the finish.

Make the racks

It’s easiest to attach the dividers before installing the shelves. With a 63.5mm-wide piece of scrap wood to space the dividers evenly, use a brad nailer to attach them to the shelves. Install the shelves with pocket hole screws.

Trim it out

Trim the wine rack with a style that matches your space. Frame it with a wide base trim to create a bold look. For jobs such as this, I like to use chair rail for a unique look.

Advertisement

Home office space

Home office space
FAMILY HANDYMAN

With more people working from home, the need has increased for a space to serve as “the office.” Unfortunately, this is often the kitchen table, the couch, a spare bedroom or, worse yet, our actual bedrooms.

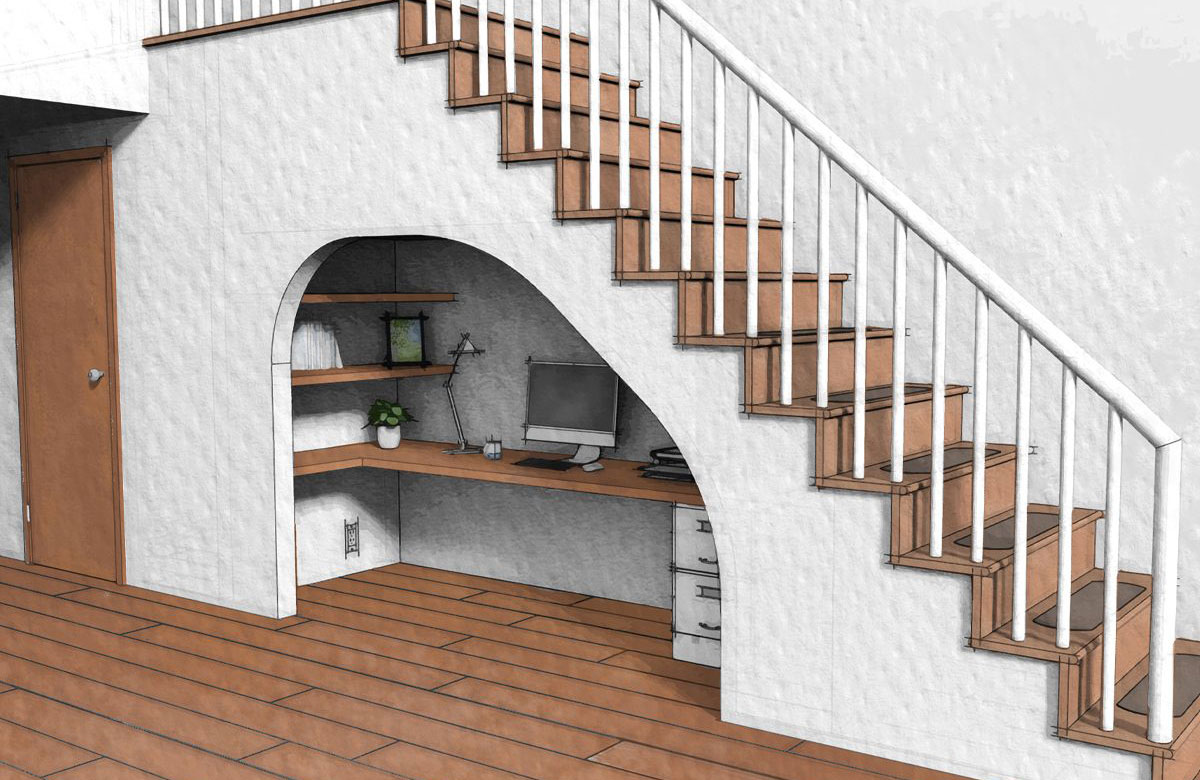
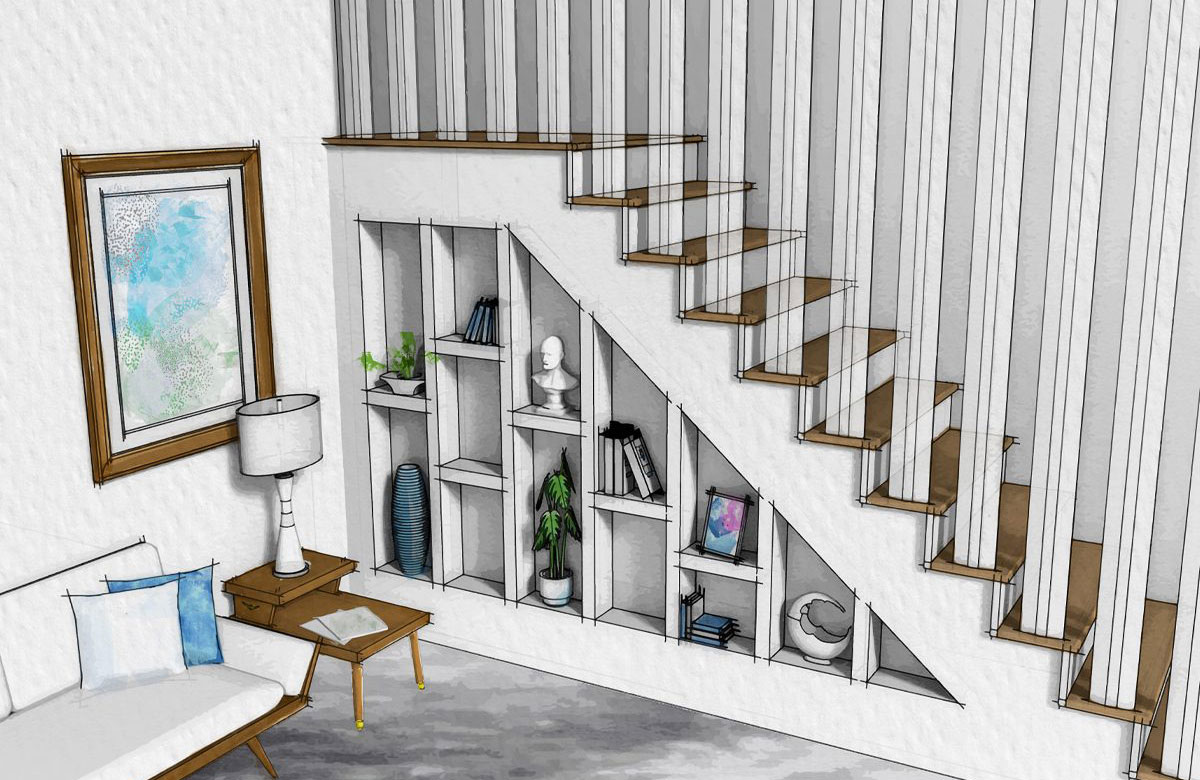
Let’s be done with that! Convert unused space under a staircase to a small but functional home office, complete with a work surface, filing cabinets, shelves and a task light.

Install a work surface

Design the space around an existing desk, or design a desk to fit the existing space. A work surface is easy to make with particleboard and plastic laminate. Anchor it to the studs so it will be strong enough to stand on!

Add cabinets and shelves

Add filing cabinets and shelves to outfit your new work-at-home digs. Store-bought filing cabinets with two drawers are typically 760mm tall. Make sure they will fit under your work surface.

Consider adding electrical

Computers, printers and task lights all need power. An extension cord will do the trick, but it can be unsightly. Consider adding electrical outlets along the inside wall. You might be able to draw from an existing receptacle in an adjoining room.

Discover 13 office storage ideas to help productivity.

Day bed reading nook

Day bed reading nook
FAMILY HANDYMAN

This nook with a daybed is a perfect hideaway for alone time with a glass of wine and your favourite book. It can also double as a guest bed for kids’ sleepovers. It’s like adding an entirely new room without nearly as much work.

Add shelves

You know that teetering stack of books on your nightstand? You can move a few down here if you add shelves to the side wall. Build them into the stud wall and finish them with drywall for a clean look. A small nook on the back wall is perfect for a cup of coffee or tea.

Storage for more than books

Besides space for books along the front of the bed, the area underneath the mattress can also be used for blankets and pillows.

Pet lounge

Pet lounge
FAMILY HANDYMAN

What better way to show some love for our pets than to make a space just for them! A dog just wants a bed of its own, and cats want to reinforce their superiority by sitting higher than anyone else in the room. This plan suits both!

A doghouse

Simply cut a door into the wall, or frame out an entire under-stair hideaway for your buddy. Add a dog pillow for creature comfort, plus bowls for food and water. Then your pup will have a room to call its very own.

Add a cat perch

This cat perch is easy. Make a 370mm square box to fit between the studs, cut away the drywall and screw it in. Trim it to match the style of your room. Your feline will love running up the carpeted, L-shaped steps to its perch. Position the steps over the studs for maximum strength.

Here are more perfect pet projects to show your pet some love.

Simple shelving

Simple shelving
FAMILY HANDYMAN

This easy upgrade to an under-stair space adds function and style. Recessed shelves don’t require structural changes to the wall or staircase. Trim each shelf or just paint them to blend into the drywall as shown.

Simple box construction

The recessed shelf detail is easy to make. Just assemble open-faced boxes to fit within the stud cavity using 12mm plywood or medium density fibeboard (MDF). Mark the stud locations and cut the openings in the drywall. Install the boxes flush to the drywall and apply trim.

Pro tip: Whether you’re painting or staining, finish the shelf boxes before installing them.

Add adjustable shelves

Increase storage and functionality with adjustable shelves. This can be done before installation or later as your needs grow.

Use a shelf pin jig to drill the shelf pin holes accurately on both sides of the box. Cut the shelves 6mm narrower than the internal dimensions and finish the shelves to match the shelf box.

Learn how to build tower shelves.

Sign up here to have Handyman’s favourite stories straight to your inbox.

Source: Family Handyman