Build Wall-Mounted Garage Storage
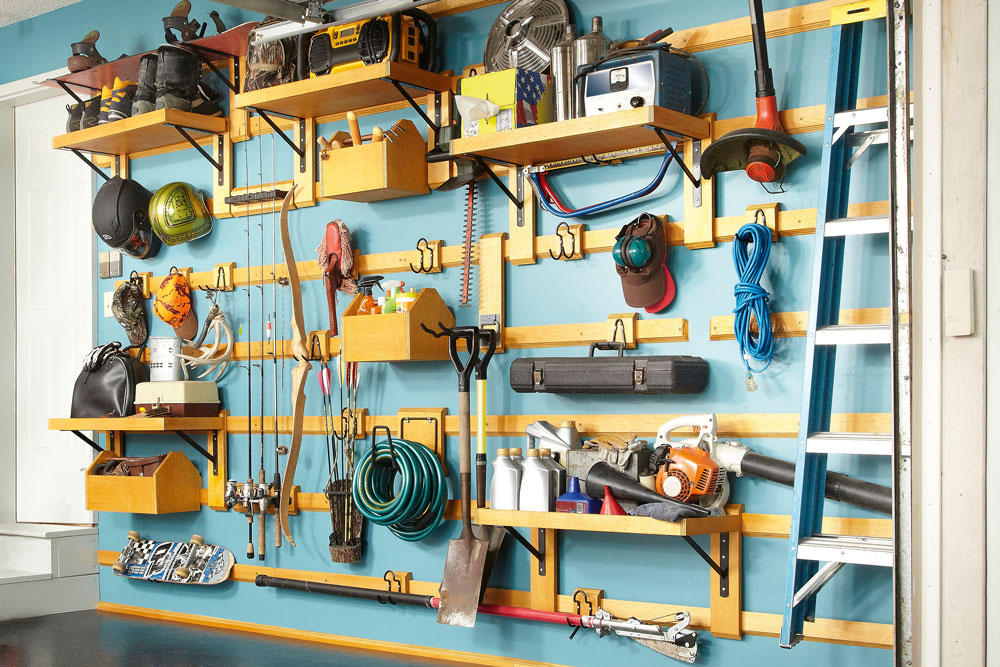
One of the biggest problems with trying to store everything that ends up in the garage is that many different types of items are always coming and going.
Whether it’s a new power tool you’ve acquired or old sporting gear that has finally been taken out for kerbside collection, adaptability is the key to keeping the garage organised.
This simple but ingenious system uses split battens to hold plywood bins, shelves and a variety of hooks mounted on hanging cleats.
As the cleats are not permanently attached to the wall, they can be freely rearranged as needed to suit your storage needs, and more can be easily made if required.
The split battens are cut from a 2400 x 1200 x 17mm sheet of pallet grade non-structural plywood, costing about $65.
One sheet can be cut into enough split battens to cover a 3600mm wide wall, and a generous assortment of hanging cleats and storage items can be cut from a second sheet.
Fasteners
Secure the plywood strips of the cutting guide to each other with 20mm x 8g countersunk screws.
Attach the split battens to the wall studs using 60mm x 10g screws.
Use PVA and 30mm x 8g timber screws to attach the hook strip to the hanging cleats, and to assemble the storage bins.
Use PVA adhesive and 30 x 2mm bullethead nails to attach the edge strip to the shelves.
Secure storage hooks to the hanging cleats and shelf brackets to the long cleats and shelves using 18mm x 10g round-head screws.
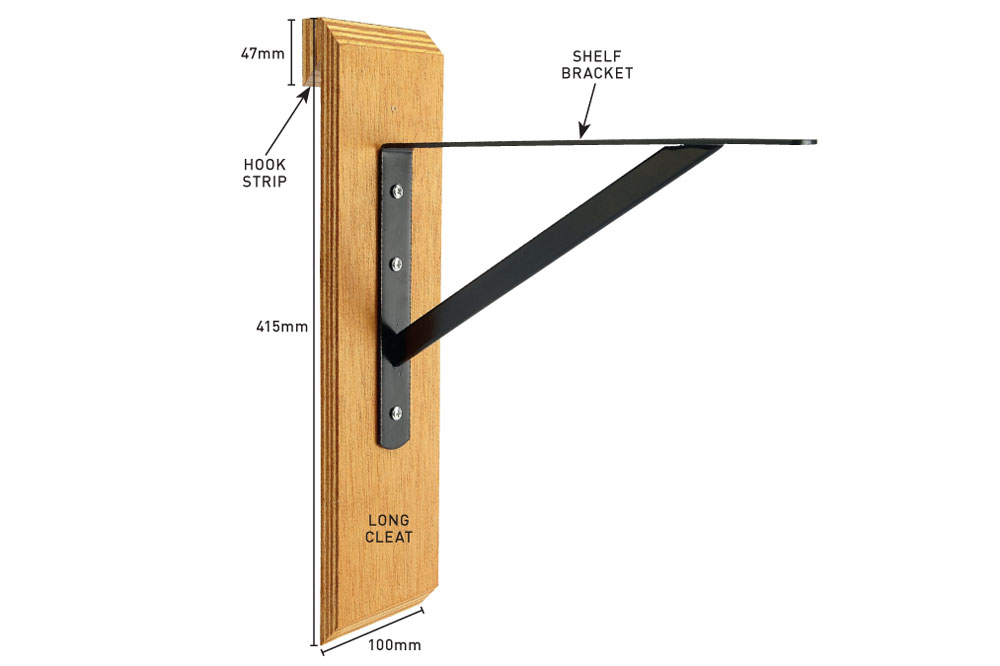
Making the hanging cleats
To attach hooks and shelves to the split battens, cut a 2400 x 100mm blank and then use it to make long and short hanging cleats.
Unscrew the strip of 6mm ply from the cutting guide and extend it about 20mm further from the straightedge, then reattach it with screws.
Reset the circular saw baseplate to 90º and run the saw along the straightedge to create a new guide.
CUT THE BLANK by measuring and marking 100mm from the edge of a second plywood sheet, then clamp the guide and cut as before.
ASSEMBLE THE CLEATS by cutting the blank into 115 and 415mm lengths, using a cutting jig to speed up the process.
Secure a 100mm length of hook strip to each cleat using adhesive and screws driven at a slightly skewed angle, then attach storage hooks or brackets to the cleats.
Cutting the cleats
A project like this involves a lot of repetitive cutting, so setting up a jig or guide to avoid having to measure and mark each individual piece saves hours of work.
Secure a 1000 x 30mm fence of scrap 17mm plywood or MDF to the edge of a 1000 x 100mm piece using adhesive and nails, then position the blank for the hanging cleats.
Clamp a speed square to the jig and trim off the end with a 45º bevel, cutting into the fence as well.
Cut the short cleats by turning the blank over and marking 115mm from the bevelled end, then align the mark with the angled cut on the fence and mark the length on the fence top as well. Run the saw along the speed square again to finish.
Cut the long cleats for the shelves by marking the speed square position on the fence then move it 300mm further back.

Use a jig and speed square to cut all the cleats quickly and accurately
Add the storage
For general storage, build simple bins and shelves from 17mm plywood.
Use two long 415mm cleats to hang the shelves and cut a 350mm length of split batten for the bins, securing it to the back and both sides.
FOR THE SHELVES cut 600 x 250mm pieces of plywood then use PVA adhesive and nails to attach an edge made from a 600 x 40mm length of plywood butted between two 267 x 40mm end pieces.
Secure a 200mm shelf bracket to each long cleat, 90mm down from the top, then attach the completed shelf, flush with the side of the cleat.
TO MAKE THE BINS cut a 316 x 191mm base, two 250 x 225mm sides plus a 316 x 165mm front and back.
Attach the front and back to the base then use a spade bit to cut a 20mm diameter recess 10mm deep into the top of the sides, centred 40mm down from the top.
Secure one side with the recess facing inwards, then cut a 335mm length of ¾in copper pipe or dowel. Position it in the recess and attach the other side to the bin and pipe.
TIP Cut the corners off the sides at 45º from the top of the front and back.
For the shelves cut 600 x 250mm pieces of plywood then use PVA adhesive and nails to attach an edge
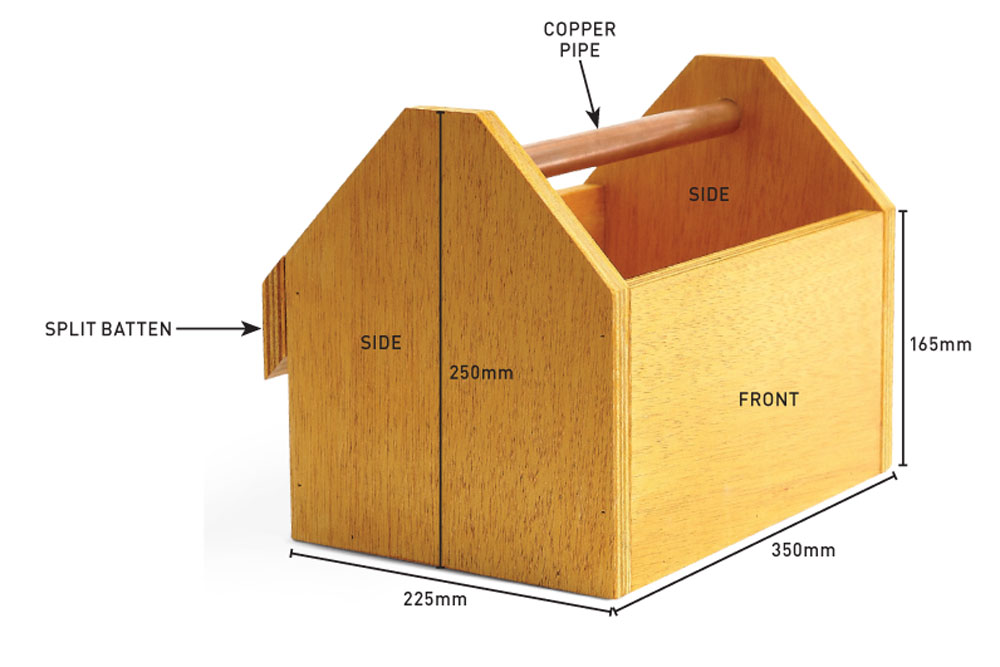
To make the bins cut a 316 x 191mm base, two 250 x 225mm sides plus a 316 x 165mm front and back
Custom units
In addition to general storage, this system is easily adapted for one-off or particularly bulky items such as sports bags or garden hoses.
To make a holder for a sports bag or other equipment, measure the item, allowing about 30mm clearance all round. Build a plywood holder this size, securing a length of split batten at the top.
To make a hose hanger, join two long cleats edge to edge by applying PVA adhesive and clamping. Secure 200mm of hook strip across the top then use screws to attach a holding bracket for a garden hose.
<img alt=”DIY bag holder with measurements, Handyman Magazine ” data-cke-saved-src=”https://www.handyman.net.au/wp-content/uploads/old_images/b-workshop-garagewallmount-bagholder.jpg” src=”https://www.handyman.net.au/wp-content/uploads/old_images/b-workshop-garagewallmount-bagholder.jpg” style=” />
To make a holder for a sports bag or other equipment, measure the item, allowing about 30mm clearance all round
Cutting the split battens
To ensure straight cuts and avoid having to measure the offset distance from the baseplate to the edge of the sawblade each time, make a simple guide using the factory edge of a new plywood sheet. Use the guide to cut stripsof plywood to use as split battens.
CUT A STRIP about 100mm wide off a new sheet of plywood, marking which side is the factory edge.
MAKE THE GUIDE using screws to secure a 250mm wide strip of 6mm plywood to the factory edge, then set the saw baseplate angle
to 45º and trim off the edge of the 6mm plywood.
CUT THE SPLIT BATTENS by measuring and marking a cut line 30mm from the edge of the plywood then clamp the cutting guide and run the circular saw along it to cut the hook strip for the hanging cleats.
Measure and mark further cut lines at 70mm intervals and clamp the guide to cut the battens.
Attach the battens
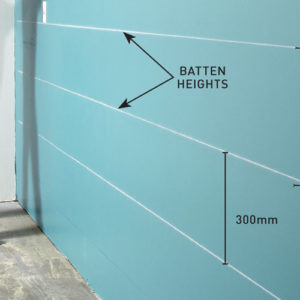
This garage storage system uses plywood split battens secured to the wall at 300mm intervals.
You’ll need 12 split battens to span the full width of a 3600mm wall.
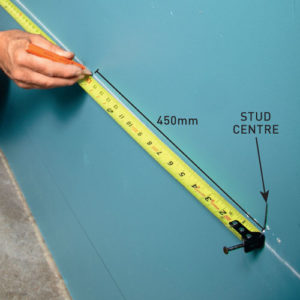
To secure the split battens, mark level lines 300mm apart on the wall then mark the stud positions.
USE A STUD FINDER to locate the studs and check whether they are 450 or 600mm apart.
For a masonry wall, use a hammer drill and masonry bit to make holes for wall plugs a similar distance apart.
MAKE A CUTTING GUIDE to ensure perfectly consistent battens and to speed up the process, and another one to make the hanging cleats.
Cut an extra batten as a heavy-duty hook strip for the storage bins.
TIP You won’t be able to use the cutting guide effectively for the last 250mm of the sheet, so use this offcut to make the shelves and bins.