Spread thin-set for the first row

Spread thin-set for the first row
FAMILY HANDYMAN

Mix thin-set and spread it just below the chalk line with a notched trowel. Press a test piece of stone into the fresh thin-set. Pull it off and check the back to make sure it’s fully covered with thin-set. If not, use a trowel with larger notches or butter the back of the stone.

Learn how to choose the right adhesive for the job.

Advertisement

Align the first row with the chalk line

Align the first row with the chalk line
FAMILY HANDYMAN

Cut and dry-fit the first row of stone before you mix and spread any thin-set. The first course takes a little longer because you have to cut it to fit to the line, but after that, the stone will go up quickly. Measure from the floor to the line and subtract 3mm to determine the height of the stone pieces. If you’re having trouble seeing the cutting line because it’s being washed off by the wet-saw spray, apply masking tape to the stone before you mark it, and then draw the line on the tape.

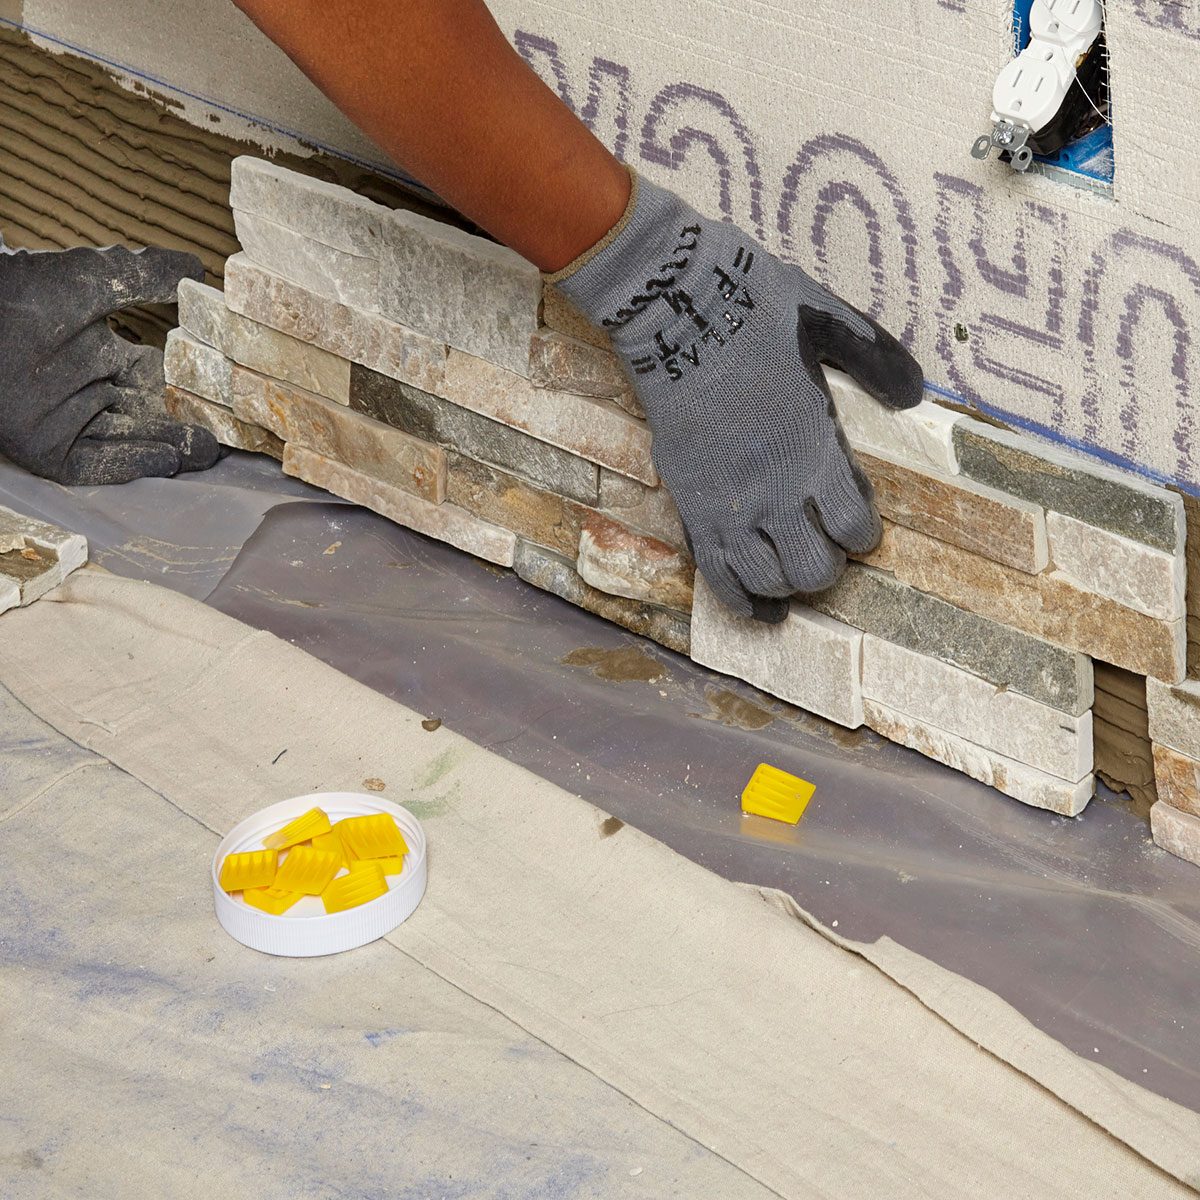
When the first row of stone is ready to install, mix a bag of thin-set mortar according to the instructions on the package, using a 13mm drill and a mixing paddle. Spread thin-set below the line using a notched trowel. Press the first piece of stone into the thin-set. Then remove it and check the back to make sure it’s completely covered with thin-set. If not, you’ll have to ‘butter’ the back of each piece of stone by spreading a layer of thin-set over it with the flat edge of your trowel, and then setting it into the thin-set on the wall. Slide plastic tile shims under the stone pieces to align the top edges with the chalk line. Press the stone pieces into the thin-set. Then slide shims underneath until the top edge is perfectly aligned with the chalk line. This will ensure that the following courses of stone will be straight and level.

The seams between the stones will be less visible if you stagger them. To do this, start the second row with a piece that’s about two-thirds as long as the piece below it, once again checking to make sure you don’t end up with a thin sliver at the far end. Spread enough thin-set to apply about two more rows of stone and work your way up the wall. Continue like this until you reach the top.

How to measure for the outlet notch

How to measure for the outlet notch
FAMILY HANDYMAN

Measure from the closest installed stone and transfer these marks to the stone you need to notch. You can stick masking tape to the stone for easier marking.

Here are some marking hacks every DIYer should know.

Notch around outlets

Notch around outlets
FAMILY HANDYMAN

Cut out the notch with the tile saw by making a series of closely spaced cuts that end at the line for the bottom of the notch. Tilt the stone up to create a square-bottom cut. Then break out the fingers and clean up the cut with a back-and-forth motion through the saw.

It’s almost certain you’ll have to cut around at least one outlet. We show how to notch the stone piece to fit, but if your outlet falls in the centre of a piece, you’ll have to use a slightly different technique. Mark the outlet on both sides of the stone. Then you can either use the tile saw, or an angle grinder with a diamond blade, to plungecut on all four sides. Start on the front of the stone and plunge until the cuts just reach the corners. Then flip the stone over and plunge-cut until the centre piece falls out. You may have to clean out the corners with a dull wood chisel, a glass-drilling bit in a drill, or a rotary tool. Later we’ll show you how to mount the outlet and fit the cover plate to the irregular stone surface.

Continue installing stone

Continue installing stone
FAMILY HANDYMAN

Work your way up the wall, offsetting the starting pieces so the joints will be staggered and less visible.

Attach shelves with angled screws

Attach shelves with angled screws
FAMILY HANDYMAN

Apply construction adhesive to the back edge of the shelf and rest it on top of a stone. Press the shelf against the wall while driving angled finish-head screws through the shelf and into studs. Make sure to position the shelves over two studs.

Here’s how to build custom shelving.

Cut stone to fit over the shelf

Cut stone to fit over the shelf
FAMILY HANDYMAN

If your shelves are exactly as long as one piece of stone, you can simply cut off the thickness of the shelf from the length of one piece of stone. Otherwise, notch the stone to fit around the shelf.

We decided to add small floating shelves to the stone wall. Then we applied ebony stain and finished them with two coats of satin polyurethane.

Plan the shelf positions by arranging strips of masking tape on the wall, making sure that there are two studs behind every shelf. Then when you reach the level of a shelf with the stone, apply construction adhesive to the back edge of the shelf, rest the shelf on the stone, and drive 80mm finish-head screws at an angle into the studs to hold the shelf in place. Rip 38mm from the bottom of a stone piece to fit over the shelf. You can work from the shelf toward the walls on both sides to finish the row of stone.

Cut and fit the top row

Cut and fit the top row
FAMILY HANDYMAN

Complete the project by installing the top row of stone. Measure and cut each piece and test the fit. Then spread thin-set onto the back of the stone pieces and press them in place.

Don’t spread any thin-set in the area behind the top row of stone. Instead, apply the thin-set to the back of each piece before setting it in place. This allows you to dry-fit the piece and makes it easier to avoid accidentally getting thin-set on the ceiling. Measure between the top stone and the ceiling, and transfer these measurements to the stone pieces for cutting. Use the technique we showed you earlier to cut the top row of stones. After you’ve checked the fit, spread thin-set on the back of the stone and press it onto the cement board.

Carve a flat spot for the cover plate

Carve a flat spot for the cover plate
FAMILY HANDYMAN

Hold the cover plate in position over the outlet and trace around it. Now use a diamond wheel in a rotary tool or a 3mm glass-drilling bit in a drill to carefully smooth out the stone in the area under the cover plate.

Install the box extension

Install the box extension
FAMILY HANDYMAN

Slip a plastic box extension over the outlet and slide it into the electrical box. Mount the outlet to the electrical box with the extra-long screws provided in the package.