Spread glue with a notched trowel

Spread glue with a notched trowel
FAMILY HANDYMAN

When you’re gluing large surfaces, an inexpensive notched plastic trowel works great for spreading the glue. To find one, look in the flooring or tile section of the hardware store or home centre. If you’re fortunate enough to have a pair of “pinking” shears in the family sewing basket, you can make our own spreader from an expired credit card.

Advertisement

Water finds hidden glue

Water finds hidden glue
FAMILY HANDYMAN

Once squeezed-out glue has been removed, there’s still a chance that some is hiding. And if you don’t find it now, you’ll see it later when you apply stain or finish. Spray some warm water near glue joints to make hidden glue more visible. The water will also soften the dried glue, making it easier to scrape off.

Let it gel, then shave it off

Let it gel, then shave it off
FAMILY HANDYMAN

Look at any woodworkers’ forum and you’ll likely find a debate about the best way to remove glue squeeze-out. Some woodworkers insist that you should clean it up immediately with a damp rag. Others let it dry completely, then scrape it off. We think that in most cases the best method is to wait about 30 to 60 minutes – just until the glue turns a darker colour and changes to a gel – and then shave it off with a sharp chisel. This will remove almost all of the glue without making a mess. You may still have a little cleanup to do, but it’s a lot less work than cleaning up wet glue or removing hard glue.

Remove excess glue with an abrasive pad

Remove excess glue with an abrasive pad
FAMILY HANDYMAN

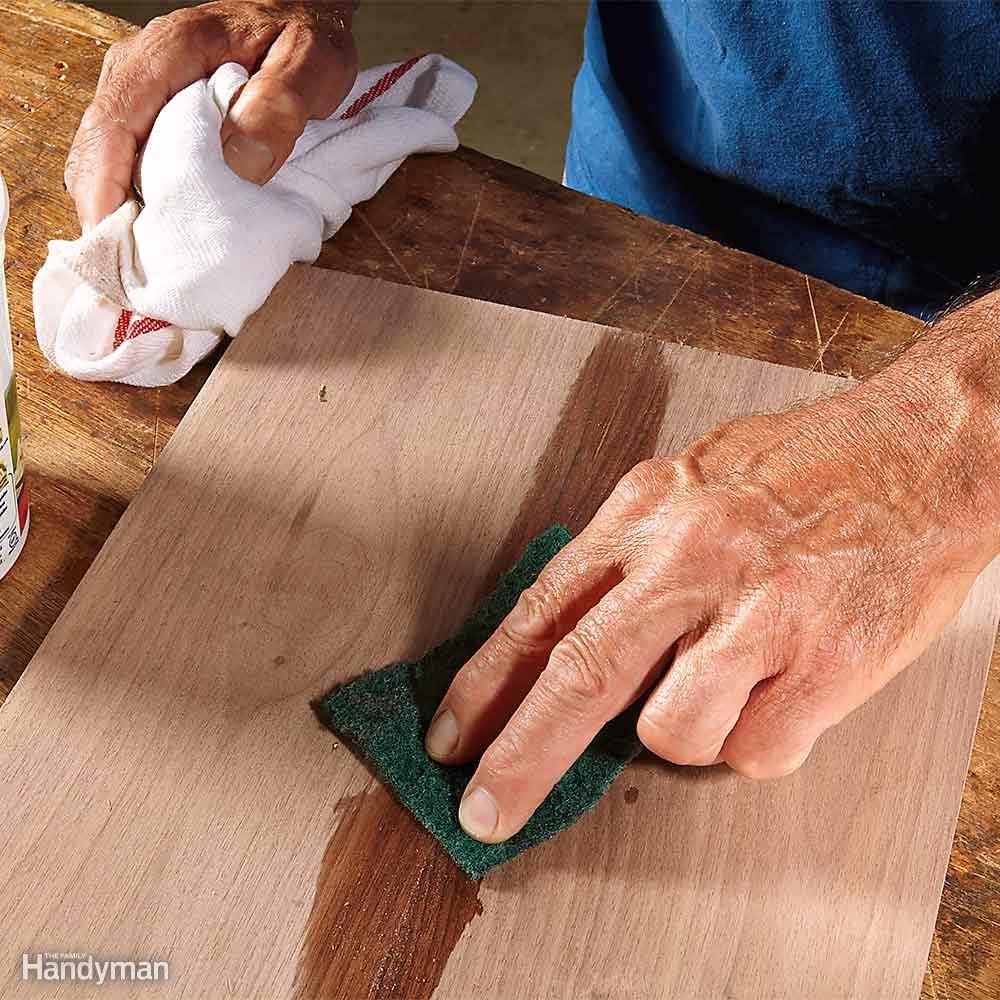
It can be difficult to remove excess glue with a rag. And if you don’t get it all off the surface when it’s wet, the dried glue can show up as light spots when you finish your project. But a synthetic abrasive pad, dampened with water, works perfectly to remove the glue. Dip the pad in a container of water. Unlike a rag, which is hard to rinse glue from, the pad has a loose synthetic weave that releases glue easily. After rinsing out the pad, shake it to remove most of the water. Then use it to scrub off excess glue. When you’re done, dry the surface with a clean rag. Green abrasive pads are found with the cleaning supplies at grocery stores, hardware stores and home centres.

Remove hardened glue with a paint scraper

Remove hardened glue with a paint scraper
FAMILY HANDYMAN

We’ve all been there. You glue up your project and then quit for the night. The next day you discover the rock-hard glue and realise that you forgot to scrape off the glue squeeze-out. Don’t despair. A sharp paint scraper makes fast work of hardened glue. Either a sharp steel scraper or, better yet, a carbide paint scraper will pop off all those glue beads in a heartbeat.

Tack, then clamp

Tack, then clamp
FAMILY HANDYMAN

Wood glue makes boards slippery, so it can be hard to keep them lined up correctly while you apply clamps. An easy solution is to hold the parts in alignment with a few strategically placed brads before you apply the clamps. For leg glue-ups like we show here, cut your parts extra long and place the brads where they’ll get cut off during the finishing process. Otherwise, just place brads where the filled holes won’t be too visible.

The right amount of glue

The right amount of glue
FAMILY HANDYMAN

With a little experience, you’ll develop a feel for how much glue is just enough. Too little glue creates a “starved joint,” which will be weak. Too much glue makes a mess and wastes glue. With practice, you’ll know just how much to apply. You should see a continuous line of small glue beads. When this perfect glue joint sets a little, you’ll find it easy to scrape off the jelled excess, and you’ll have very little cleanup to do.

Picking the best exterior glue

Picking the best exterior glue
FAMILY HANDYMAN

An exterior-grade yellow woodworking glue may work fine, especially if it’s protected by a coat of paint or somewhere out of the rain. However, for joints that get a lot of weather, use polyurethane glue; it’s one of the best wood glue products because it’s fully waterproof and bonds wood and other materials well. It’s not gap-filling, so be sure to get a good fit and clamp it.

Apply tape to control glue squeeze-out

Apply tape to control glue squeeze-out
FAMILY HANDYMAN

Glue squeeze-out soaks into the fibres of raw wood, leaving blemishes when you later apply the finish. The usual solution for this is to clean it off with a wet rag or sponge. But too much water around the joint can weaken the bond. It’s better to stick down masking tape along both edges of the joint before gluing. The excess glue will then squeeze out onto the tape instead of the wood, and you can just peel the glue away when it’s dry.

Glue + sawdust = wood filler

Glue + sawdust = wood filler
FAMILY HANDYMAN

When you need wood filler that matches the colour of your project, mix some fine sawdust and glue together until it forms a paste, which you can use to fill small gaps and cracks. For best results, use sawdust from the same species of wood as your project; you can get some from the bag on your electric sander. Just don’t try this trick for large gaps or patches – they’ll stick out like a sore thumb.