Quick table legs

Quick table legs
FAMILY HANDYMAN

If you need to build a quick table, here’s a great way to make the legs. We’ve used this design to make tables for cabins, and utility tables for the shop and yard. Each leg is made from 19mm x 140mm timber ripped to make two tapered pieces. Glue and nail (or screw) the two pieces together, sand as much as you feel is necessary, and you’re done. The taper jig is quick to make, but it works only for this particular taper.

Advertisement

Straighten a crooked edge

Straighten a crooked edge
FAMILY HANDYMAN

If you run the crooked edge of a board against the table saw fence, you’ll still have a crooked board when you’re done. Or worse, the board will get bound between the fence and the blade during the cut.

Here’s a handy, low-tech way to straighten the edge of any board. Just fasten the crooked-edge board to a straight strip of plywood, letting it overhang the edge. Then run the straight edge of the plywood against your table saw fence to make a perfectly straight edge on your crooked board.

Mount a featherboard for accurate rips

Mount a featherboard for accurate rips
FAMILY HANDYMAN

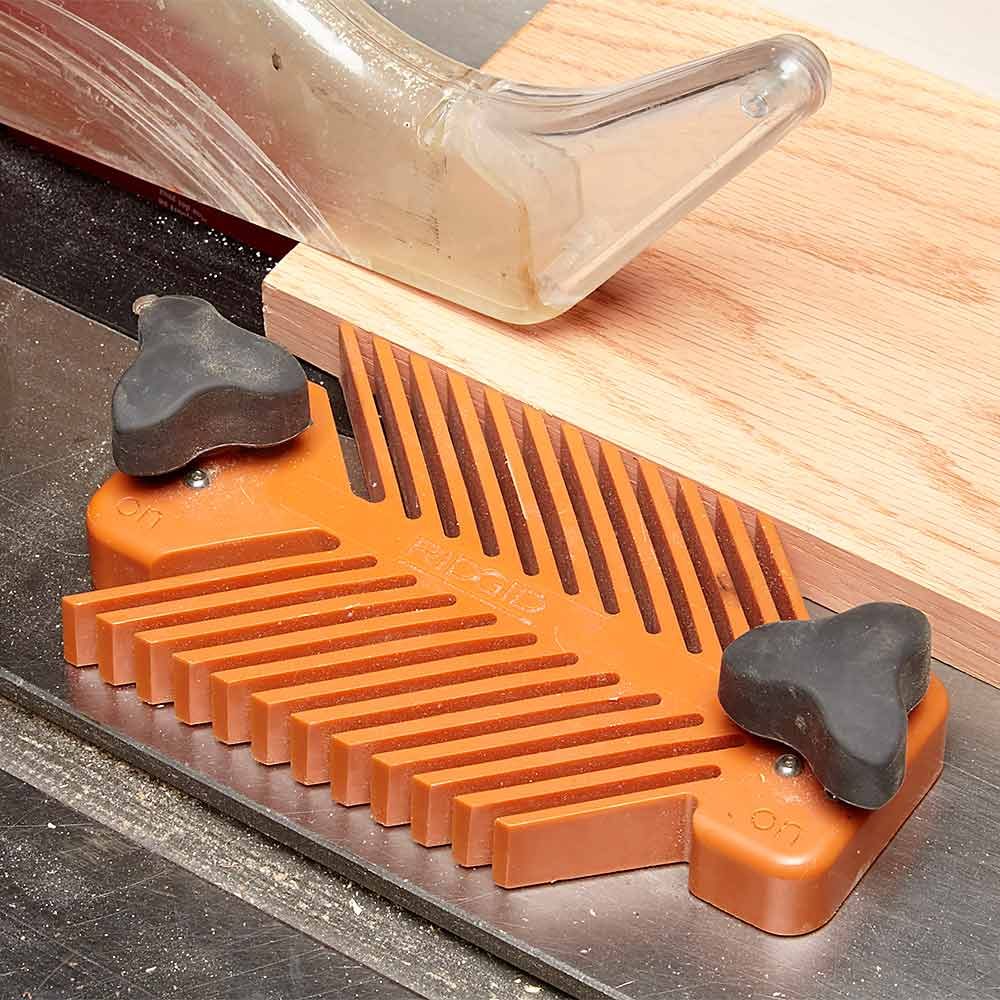
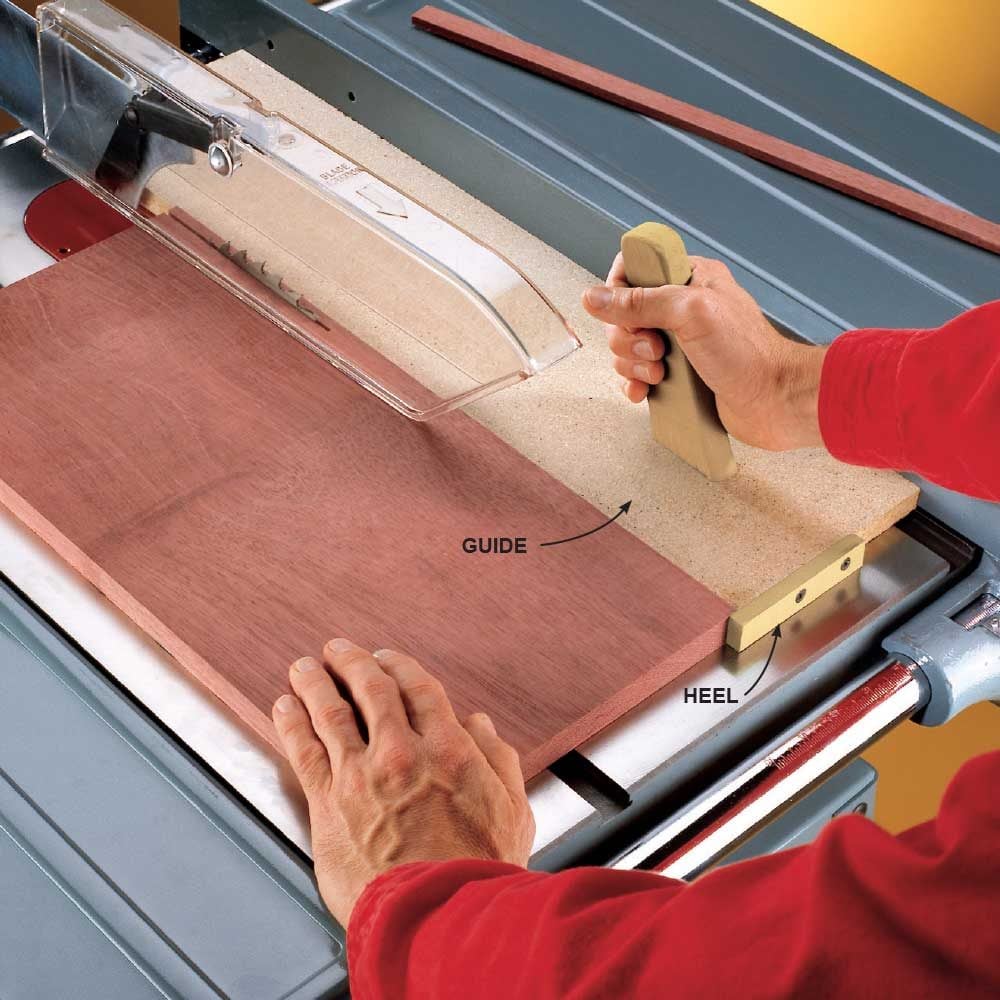
There are times when you want your rips to be super accurate, like when you’re building face frames, door parts or other cabinet components. The key to accurate rips is to keep the edge of the board in constant, tight contact with the fence. It’s easy with a featherboard mounted on your table saw top. This featherboard has expanding rails that lock into the mitre gauge track.

If you have a cast iron bed on your table saw, you could buy a featherboard that attaches with super-strong magnets that make it simple to position and adjust. You can also make your own featherboard out of wood, and clamp it to the saw. Some saw manuals have instructions for this, or you can search online. Adjust the featherboard to apply a small amount of pressure to the board as you feed it through the blade. Make sure the “feathers” are in front of the infeed side of the saw blade to prevent binding. With a featherboard, your rips will be dead-on accurate every time.

Use a half fence for unruly boards

Use a half fence for unruly boards
FAMILY HANDYMAN

Wood with knots or wavy grain and wood that has been dried unevenly will often warp badly as you rip it. If the halves bend outward, one will push against the fence and could cause burn marks or a dangerous kickback. If this begins to happen, shut off the saw and remove the board. You can rip the board safely by clamping a smooth, straight length of 20mm wood against the fence, ending at the centre of the saw blade. This half fence gives the trapped piece (the section between the blade and the fence) room to bend without pushing back against the blade. Keep push sticks handy so you can work around the clamps and complete the cut smoothly.

This is why wood moves and why you need to know.

Clamp on a long fence for long boards

Clamp on a long fence for long boards
Family Handyman

Keeping a long, heavy board or a full sheet of plywood tight against a short fence is a challenge, especially when you work alone. It’s all too easy for the wood to wander away from the fence, ruining the cut or causing the blade to bind and leave burn marks along the edge. To avoid these problems, clamp a long level or a long, straight board to the fence. The longer the fence, the easier it is to keep the wood firmly against it.

Outfeed plus

Outfeed plus
Family Handyman

What’s the best way to support long pieces of wood when ripping them with your bench-top table saw? One solution is to buy a couple of 3m 35mm x 90mm and then screw 2.5m piece of 20mm plywood over the top to serve as an outfeed table. You’ll have to notch the protruding 35mm x 90mms to make the top even with the outfeed surface and leave enough room behind the saw for the backside of the fence mechanism.

You should also drill a set of countersunk holes in the table saw top and screw the saw down to the protruding 35mm x 90mms. The weight of the table keeps the whole assembly stable, but for extra insurance, toe-screw the long 35mm x 90mms to the tops of your horses. This dandy outfeed table makes a great assembly and temporary workspace as well. When you’re done, prop it up against the shop wall and it’ll be ready for the next job.

Here are 28 brilliant woodworking tips for beginners.

Dado guide using standard blade

Dado guide using standard blade
Family Handyman

Cut accurate dadoes without a dado blade by making successive passes over the blade. The tough part here is to get a tight fit. Screw a 19mm x 64mm fence extension to your mitre gauge and make a saw kerf in it. For a tight fit, trace the width of the board onto the homemade mitre gauge fence extension. Then follow the photos. Try this method on a test piece to get the hang of it.

Step 1: Make your first cut by aligning the top dado mark with Line No. 1 drawn on the mitre gauge fence. This cut establishes the top of the dado. The line takes into account the thickness of your blade.

Step 2: Make your second cut by aligning the same dado mark with Line No. 2 on the fence shown in Step 2. This cut establishes the bottom of the dado. To finish the dado, just make several passes to cut away the area between your initial cuts. Make slight adjustments if the fit is too tight or too loose.

Cut skinny strips safely

Cut skinny strips safely
Family Handyman

Cutting thin strips can be dangerous. There’s no space between the blade and the fence for a push stick, and on some table saws you have to remove the blade guard. Five minutes and a 15-cm wide scrap of plywood or particleboard are all you need to cut safely and quickly. Just screw a wooden “heel” to the scrap and you’ve got a sliding guide that lets you leave the guard in place and keeps your fingers safe. Add a handle to make it easier to pull the guide backward after each cut.

Learn about tool safety for DIYers.

Dirt-cheap flip-up stop

Dirt-cheap flip-up stop
FAMILY HANDYMAN

We’ve used this setup for many years. It’s a classic. Flip it up to cut one end of a board square; flip it down to cut the board to length. If you make one, choose a hinge without much play, and knock off the corners of the blocks so sawdust doesn’t build up.

Discover 8 alternative uses for sawdust.

Worktable conversion

Worktable conversion
Family Handyman

Admit it: You sometimes use your table saw as an auxiliary workbench, slopping it up or damaging it. Better to build a plywood cover to protect it from glue, paint and tools. Cleats at the edges prevent the cover from sliding off the saw. Makes a great coffee table too.

Sign up here to have Handyman’s favourite stories straight to your inbox.

Source: Family Handyman